My favorite part of New Year's eve is to reflect on the past year. My word and goal for 2012 was "Create". And I feel I did a lot of "Creating" this year. I started an Etsy shop to sell my handmade jewelry and even though I have only sold one item I am still proud of the accomplishment. Tiny Human and I completed several craft projects. I taught myself to crochet. And my biggest creative success is being on Let's Scrap Design team. And my scrapbook is proof of all the memories that have been created all year long.
Here is a list of my top 12 blog posts of 2012:
1. Toddler Finger Painting Project
2. Homemade Moose Costume
3. 2 Birds With 1 Stone(Layout)
4. Cinnamon Ornaments
5. 1st Contest Entry
6. Crochet Scarf
7. 1st Day Home
8. Creative Scrappers
9. DIY Finger Paints
10. Life is Grand With You
11. Dandelion Tote Tutorial
12. Dress for Success
I'm pleased that the list is almost 1/2 scrap booking related and 1/2 craft projects. I would like to thank my 7 followers for reading my posts and following Crafting and Scrapping! Wishing all of you a blessed and happy New Year.

Monday, December 31, 2012
Saturday, December 29, 2012
Cinnamon Ornament Layout
I can't believe this will most likely be my last layout of 2012! Wow did the year fly by. The sketch I used is this week's from Let's Scrap. I liked how fun and simple it was. Perfect for Cinnamon Ornaments that the Tiny Human and I made. The pictures don't show the crazy frustration that comes with doing crafts with a toddler. But all in all we had a great time and provided excellent scrapping material.

The tree paper I've had in my stash for ever, not sure of the brand. The Christmas Polk-a-dot paper, red card stock and white card stock are from "The Paper Studio". The flower stickers are K&Company.
The red present washi tape is Studio G. I found it in the $1 section of scrapping supplies at Wal-mart. This was the first time I've used washi tape and I'm hooked. The other DT members at Let's Scrap are always talking about it so I decided to give it a go.

Thanks for stopping by and I will see you next year :)
Friday, December 21, 2012
It's Your Day
Happy Friday!
I'm having so much fun making cards lately! I like the personal touch of sending a homemade card opposed to the store bought ones. Now if I could become as witty as Hallmark :) This card is another take on this week's sketch at Let's Scrap. It's a Birthday card for my sister. I tried to capture some of the colors of Christmas without making it a Christmas card.

Wednesday, December 19, 2012
Let's Scrap 12-19-12


You love the holly leaves and berries don't you ;) Me too!! I had to get creative to make the berries. Here is the secret: Use the eraser end of a pencil dabbed in red ink. Easy as pie and it looks great too.
I used Studio G brown glitter glue on the red strip of paper. You can never have enough sparkle! Thaks for stopping by and don't forget to come play along at Let's Scrap.
 |
| The inside of the card. |
Saturday, December 15, 2012
Snowbody Warms My Heart Like You
I found inspiration for this card from looking out my living room window. My neighbors have several evergreen trees along the boarder of their yard and they are so beautiful dusted from a recent snow fall. The card I made was really simple. I used this sketch 8-17-11 from Let's Scrap.

Here is my take on the sketch. I cut the trees using the Cricut craft rooms basics and the sentiment background is from the playtime cartridge. I had to print out the sentiment since I currently don't have any winter stamps. All of the papers used for the card are scraps from my stash. I used Studio G silver glitter glue to boarder the card and make the snow on the trees.

Here is my take on the sketch. I cut the trees using the Cricut craft rooms basics and the sentiment background is from the playtime cartridge. I had to print out the sentiment since I currently don't have any winter stamps. All of the papers used for the card are scraps from my stash. I used Studio G silver glitter glue to boarder the card and make the snow on the trees.

Thursday, December 13, 2012
Cinnamon Ornaments
Tis the season to be jolly and attempt to do a toddler craft project. Recently the Tiny Human discovered the fun of play dough so I thought that he would enjoy this project. The dough is really easy to make. Here is what you will need:
Apple Sauce- 2 cups
Cinnamon - 2 cups
cookie cutters
wax paper
Rolling Pin
 Step 1:
Mix the apple sauce and cinnamon together in a bowl. You should get a nice firm dough. If it's too dry add more apple sauce, to moist add more cinnamon.
 Step 2:
Roll out dough in between 2 pieces of wax paper with a rolling pin. Dough should be 3/8 of an inch thick. Be careful not to get the dough to thin or your ornaments will break easily when they are dry.
 Step 3:
Use cookie cutters to make ornament shapes. Place shapes on a cookie sheet to dry. Using a tooth pick or straw poke holes in the shapes to string them when they are dry.
 Step 4:
Next step is to let them dry. I baked mine in the oven at 200 F for 4 hrs. Flip shapes over after a couple of hours in the oven. Then let the sit over night before stringing. You can also let the shapes air dry for 2 days, turning a couple of times a day.

Apple Sauce- 2 cups
Cinnamon - 2 cups
cookie cutters
wax paper
Rolling Pin

Mix the apple sauce and cinnamon together in a bowl. You should get a nice firm dough. If it's too dry add more apple sauce, to moist add more cinnamon.

Roll out dough in between 2 pieces of wax paper with a rolling pin. Dough should be 3/8 of an inch thick. Be careful not to get the dough to thin or your ornaments will break easily when they are dry.

Use cookie cutters to make ornament shapes. Place shapes on a cookie sheet to dry. Using a tooth pick or straw poke holes in the shapes to string them when they are dry.

Next step is to let them dry. I baked mine in the oven at 200 F for 4 hrs. Flip shapes over after a couple of hours in the oven. Then let the sit over night before stringing. You can also let the shapes air dry for 2 days, turning a couple of times a day.

Tuesday, December 11, 2012
Crochet Fingerless gloves
After making a few dish cloths,a scarf and a coffee sleeve I began to feel pretty comfortable crocheting. Or at least adventurous to try something new, a friend mentioned wanting a pair of fingerless gloves so I began searching the Internet to find an easy pattern. If you ever need a pattern for anything I recommend using Crochet Pattern Central.
 I first used this patten. It was easy to follow and well written for a beginner like me. You can't really tell but there is a small cuff at the top of the glove.
 Yes one came out slightly larger than the other but I'm still proud.
The next set I made I sort of made up my own pattern. I got the idea for the buttoned cuff from the coffee sleeve I had previously made. Then I basically followed the first pattern.

 It was tricky to do this set because for the second glove I had to do the patter backwards due to the button cuff. This set is my favorite. I'm kinda sad to be giving them away but I know my friend will enjoy them. Thanks for checking out my latest adventures.


The next set I made I sort of made up my own pattern. I got the idea for the buttoned cuff from the coffee sleeve I had previously made. Then I basically followed the first pattern.


Friday, December 7, 2012
Horse Critter Hat
Here at Santa's workshop, I mean my house I have been a crocheting elf lately. I'm trying to get all of my homemade Christmas gifts done by the 13th then mailed by the 15th so I have been very busy. My latest project was an ear hat flap for my niece and nephew. I cam across this pattern from Crochet Creative Creations and fell in love.
Here is what I came up with. Don't mind the stuff bunny that is my model. Tiny human didn't want to play along, and the hat is a bit small for him. I did make a few changes to her pattern, I used the dark brown yarn and made several X's with a tapestry needle for the eyes and I made around 6 pom poms for a super full mane. The only problem I had was attaching them, o well I think the hat turned out cute considering I just learned to crochet about a month ago. Happy Friday and thanks for stopping by!
Here is what I came up with. Don't mind the stuff bunny that is my model. Tiny human didn't want to play along, and the hat is a bit small for him. I did make a few changes to her pattern, I used the dark brown yarn and made several X's with a tapestry needle for the eyes and I made around 6 pom poms for a super full mane. The only problem I had was attaching them, o well I think the hat turned out cute considering I just learned to crochet about a month ago. Happy Friday and thanks for stopping by!
 |
| The front side |
 |
| The back side |
Wednesday, November 28, 2012
Big News!!!
I am very excited to announce that I will be on Let's Scrap December-March Design Team! I would like to congratulate the other ladies on making the team and am looking forward to working with you this term.
A big round of applause to the following ladies:
A big round of applause to the following ladies:
Cathy VandeBruinhorst (DT Coordinator)
Charlotte van Wijk
Michelle Looi
Jeaunes Viljoen
Kristine Ponte
Eniko Delisle
Janet Gregory
Heather Corbitt
Val Thorpe
Martha Sterbens
Tuesday, November 20, 2012
Stamped Tea Towel
Happy Tutorial Tuesday!
Today I'm going to show you how to make cute stamped tea towels. They are a great handmade gift and the possibilites are endless.I made 9 of them in a little over an hour. I would recommend having 1 extra towel to try out your stamp. That way you will know how much paint and pressure to apply to get your desired image.
Here are the supplies you will need:

Next decide on a pattern and where on the towl you are going to stamp. You can create a design to cover the whole towel or do just the edges to make a boarder. I did along the top and bottom edge to create a boarder when the towel is hanging.

Now you are ready to create! I squeezed out a big glob of paint on to the lid and dabbed my brush into it a couple of times. Remember its best to start with less paint. Gently apply the paint to your stamp using the foam brush. Then with even pressure stamp the towel. I practiced a few times to get the right amount of paint and pressure.
Here are my finished product. They turned out great and were realtively inexpensive to make. Hope you enjoyed this tutorial. If you use it come back and leave a link to your project, I would love to see what you made.

Today I'm going to show you how to make cute stamped tea towels. They are a great handmade gift and the possibilites are endless.I made 9 of them in a little over an hour. I would recommend having 1 extra towel to try out your stamp. That way you will know how much paint and pressure to apply to get your desired image.
Here are the supplies you will need:

- Tea Towel ( $1 at Dollar Tree or Walmart)
- Fabric Paint ( I got mine at Hobby Lobby $3.49, I had a 40% off coupon so they were even cheaper)
- Foam Brush ($1 at Walmart)
- Rubber Stamps ($1 each from JoAnn's)
- Something to put the paint in ( I used a lid from a cottage cheese container)
Next decide on a pattern and where on the towl you are going to stamp. You can create a design to cover the whole towel or do just the edges to make a boarder. I did along the top and bottom edge to create a boarder when the towel is hanging.

Now you are ready to create! I squeezed out a big glob of paint on to the lid and dabbed my brush into it a couple of times. Remember its best to start with less paint. Gently apply the paint to your stamp using the foam brush. Then with even pressure stamp the towel. I practiced a few times to get the right amount of paint and pressure.
 |
| I did the red snowflakes first. One in each corner and then one in the center.Followed by another red snowflake in the between. Then a blue in between each red. This helped with making the spacing consistent. |
 |
| This one was made using the clear stamps on an acrylic block. I didn't like how it turned out. |

Monday, November 19, 2012
Let's Scrap DT application
I love Let's Scrap. It's a great site not only to find 2 page sketches but also a community of scrappers to share your work with. I was really excited to see that they are looking for they are looking for term Design Team. I have applied to several other DT's in the last couple of months and have decided this will be my final application for awhile. So my fingers are crossed and hope that I make the team :)
The stickers I have had in my stash for awhile now. And the ribbon was part of a prize I won from Scrappin' ..... Expect the Unexpected. I don't remember what brand it was.


 |
| A close up view of the first page |
 |
| Close up view of page 2 |


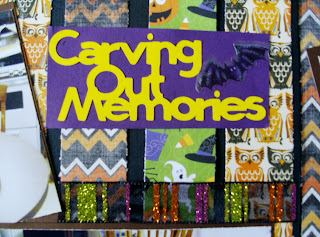
I made the title using Cricut Craft room and the weld feature to make the phrase all one piece. It took a lot of trial and error and several curse words but I'm happy with how it turned out. I thought the bat sticker was a great addition to the page since we carved a bat on our pumpkin.

Thanks for stopping by have a great Monday!
Wednesday, November 7, 2012
Crochet Scarf
I have been bitten by the crochet bug! I have a list a mile long of all of the projects I would like to make. Since I am just getting started I'm trying to keep them as simple as possible. I see many scarfs in my future as I become more comfortable with the different stitches.

After looking at several patterns for infinity scarves on Pinterest I came across this one. I like how it was worked in a flat piece then stitched up at the end. Another great benefit is it only takes 1 skein of yarn. Jay's Boutique Blog has several cute free patterns that I'm sure I will be making in the future.
|
|
This scarf isn't very long but wrapped around your neck twice makes a great cowl. The color is hard to see. The yarn I used was mostly tan with flecks of navy, red and green in it. It took me about a day and half to make. Not to bad for a beginner ;) My next project is a coffee sleeve using the left over yarn from this project!
Monday, November 5, 2012
Learning to crochet
Happy Monday!
I'm taking a break from paper crafting for awhile. It seems I've lost my mojo, so while I'm waiting for it to return I decided to learn a new craft. Thanks to pinterest and crafty groups I belong to I got inspired to start crocheting.
At first I tried using a couple books my Mom gave me. I learned how to do the basic chain and that's about it. The pictures and the descriptions had me confused. I googled " how to crochet" videos and came across this great site. She has a Crochet School which is a series of posts that have step by step videos that walk you through each step and basic stitch of crochet.
After watching the videos I got brave enough to try a project of my own. I had some great cotton yarn from Peaches and Cream left over from a past knitting project so I decided to try my hand at a wash cloth. I guess the books came in handy after all because that's where I found the pattern.
 I struggled quite a bit with tension so my rag ended up a little lop sided. I did 2 rows of a single crochet around the edge to make a boarder. I'm pretty happy with my first attempt.
Currently I'm working on a cowl scarf so far so good I will post about it once I get it finished. Have a great week!
I'm taking a break from paper crafting for awhile. It seems I've lost my mojo, so while I'm waiting for it to return I decided to learn a new craft. Thanks to pinterest and crafty groups I belong to I got inspired to start crocheting.
At first I tried using a couple books my Mom gave me. I learned how to do the basic chain and that's about it. The pictures and the descriptions had me confused. I googled " how to crochet" videos and came across this great site. She has a Crochet School which is a series of posts that have step by step videos that walk you through each step and basic stitch of crochet.
After watching the videos I got brave enough to try a project of my own. I had some great cotton yarn from Peaches and Cream left over from a past knitting project so I decided to try my hand at a wash cloth. I guess the books came in handy after all because that's where I found the pattern.

Currently I'm working on a cowl scarf so far so good I will post about it once I get it finished. Have a great week!
Wednesday, October 31, 2012
Happy Halloween!!!!
Happy Halloween!
Hope everyone is having a spooktacular day! Today has been a bit hectic and crazy but that's pretty par for the course around here. And as evening approaches its looking better!
As a child my costumes were often homemade, mostly because we couldn't afford the fancy store bought ones. I loved it! My favorite was when I went as a bag of jellybeans (picture a small child with head, arms and legs sticking out of a clear garbage bag filled with colored balloons). These fond memories led me to make a costume for Tiny Human this year. And of course I waited until last minute to do it.
2 nights ago after 4 1/2 bags of cotton balls and several hot glue burns later I had successfully created an adorable sheep costume I thought Tiny Human would love. Sheep are his favorite animal. He loved it until we tried to put it on him. He love turned into pure terror. He cried, screamed, flailed around and pulled off 80% of the cotton balls in the 3 attempts to put it on him.
So last night I went back to the drawing board aka Pinterest to search for a cheap home made costume. I really wanted to make something he would be able to use again. Originally I wanted to make this Dino Costume but knew I didn't have the time or money to do so. Then I found this Moose hoodie. Ding Ding Ding we had a winner. Cute, cheap and reusable!


Hope everyone is having a spooktacular day! Today has been a bit hectic and crazy but that's pretty par for the course around here. And as evening approaches its looking better!
As a child my costumes were often homemade, mostly because we couldn't afford the fancy store bought ones. I loved it! My favorite was when I went as a bag of jellybeans (picture a small child with head, arms and legs sticking out of a clear garbage bag filled with colored balloons). These fond memories led me to make a costume for Tiny Human this year. And of course I waited until last minute to do it.
 |
| Cute sheep costume, prior to Tiny Human |
2 nights ago after 4 1/2 bags of cotton balls and several hot glue burns later I had successfully created an adorable sheep costume I thought Tiny Human would love. Sheep are his favorite animal. He loved it until we tried to put it on him. He love turned into pure terror. He cried, screamed, flailed around and pulled off 80% of the cotton balls in the 3 attempts to put it on him.
 |
| After Tiny Human |

I couldn't find a plain brown hoodie anywhere this morning. I went to at least 6 stores. I did find a fleece hoodie and pants at Old Navy and decided I could cover up the logo with material. I used a piece of 12 x 12 card stock folded in half to make a template for the light brown circle. I then used the template to cut the circle out of a light brown hand towel. I cute the circle in half and attached each half to the hoodie using a long stitch by hand. I didn't want it to be permanent.
 |
| I had to try it out :) |
Next I stuffed to cream colored knit gloves with a ton of fiber fill. Next rolled the cuff of the glove up into the glove then pinned onto the hoodie. It took moving them around several times before I got them in the right place. Once again I hand stitched them on, this time using close small stitches. Overall the sheep took 2 1/2 hrs and about $5 since I had the shirt and material for the ears on hand. The moose took a little over an hour to make and cost $20 since I had to buy the hoodie,pants and gloves.
 |
| He was a bit cranky and hates things on his head. |
Next year I will either start the costume making process weeks before Halloween or leave it up to Tiny human's very creative Grandma ;)
Thanks for checking out my blog have a great day!

Monday, October 29, 2012
Sketch with Color
If you haven't check out Sketch with Color you should. They are a new challenge blog that combine sketches and color challenges. You have until tomorrow if you are interested in applying for their Design Team. Spread the word and help this blog take off :)


Friday, October 26, 2012
Fall is Here
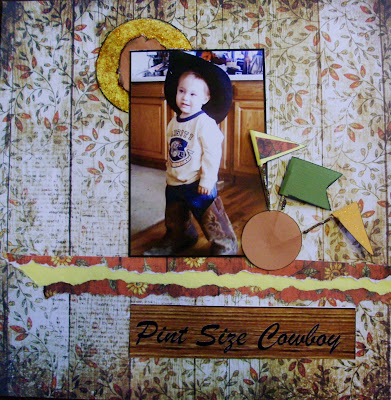
O my goodness its Friday already! Its been a slow week for crafting for me. My Lil monster has been sick so that makes for a tired and unproductive mommy. I did manage to get a festive fall layout done yesterday though. I took these pictures last month when the leaves were just starting to change and we still had warm weather. Lil monster loves to play outside and enjoyed collecting sticks in the yard.
The sketch I used is #77 from Sketchabilities. I really liked the grid like background and how the pictures were layered.
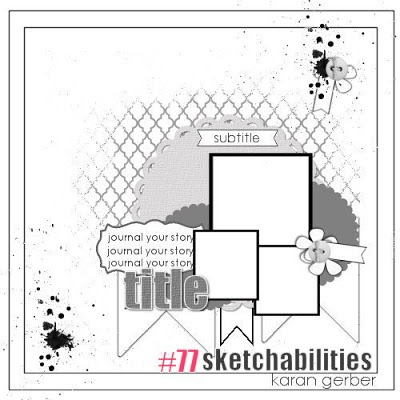
I had to get creative with the background. To make the grid design I cut a plastic mesh bag that oranges came in in half. Next I used glue dots to hold the bag in place on my paper then used brown ink pad from Studio G to create the pattern.

All of the colored papers are scraps from my stash. Great fall colors! The leaf embellies are left overs from a project last year. And the Gems are from The Paper Studio.
The sketch I used is #77 from Sketchabilities. I really liked the grid like background and how the pictures were layered.
I had to get creative with the background. To make the grid design I cut a plastic mesh bag that oranges came in in half. Next I used glue dots to hold the bag in place on my paper then used brown ink pad from Studio G to create the pattern.

All of the colored papers are scraps from my stash. Great fall colors! The leaf embellies are left overs from a project last year. And the Gems are from The Paper Studio.
 |
| Close up view of the top right corner. |
 |
| The jewel tones of the gems look great next to the glittery leaves |
 |
| I used a Martha Stewart punch to create the doily look around the squares. The journal tag I cut out using The Classic Font cartridge from Cricut.
Thanks for stopping by have a wonderful weekend!
|
Monday, October 22, 2012
Stamping up a card
Mother Nature decided to crash my planned scrap day with Jen on Thursday. But thanks to Skype we were able to still get each others much needed opinions :) And with this card I definitely needed a second opinion. The sketch is from Lets Scrap.
 I recently got this cute stamp set from Studio G. I instantly fell in love with the Halloween paisley, honestly its the cutest thing ever. Jen gave me the idea of creating my own patterned paper with the set. I used an alphabet set also from Studio G for the lettering. On the front of the card I drew over the stamping with a silver pen.

This card is for my friend's son that turns 1 on Halloween. I never know what to get other people's kids so I made the pocket for a gift card. I had to use that cute stamp one more time! The candy corn and the pumpkin embellishment are both from The Paper Studio. Thanks for taking a look have a great week.


This card is for my friend's son that turns 1 on Halloween. I never know what to get other people's kids so I made the pocket for a gift card. I had to use that cute stamp one more time! The candy corn and the pumpkin embellishment are both from The Paper Studio. Thanks for taking a look have a great week.

Saturday, October 20, 2012
Anniversary Card
My Mom and Step Dad celebrated their 8th wedding Anniversary last week. I'm so happy for them! And as usual I'm a week behind on getting out their card. This card is of my own design. I'm trying to be thrifty and scrap my stash. The stamps I used are from Studio G and so is the black glitter glue. I love how simple yet elegant this card is.

I used the flourish stamp in the inside as well. I'm just getting into card making and I'm really having fun with it so far. Have a great Monday thanks for stopping by.


I used the flourish stamp in the inside as well. I'm just getting into card making and I'm really having fun with it so far. Have a great Monday thanks for stopping by.

Friday, October 19, 2012
Sketch With Color DT Application
I just found another challenge blog and how exciting that they are accepting applications for a DT! You can check out the details at Sketch With Color. You have until the 25th if you want to apply.
This post is my application to the Team. I will show you my take on their sketch plus two of my best recent layouts.
Here is the sketch they provided.

And this is my take on the sketch. I like the banners and borders along the photo. I inked around the circles and the pennants with black Studio G ink. I used orange Studio G glitter glue on the circle in the top corner and copper Studio G glitter glue on the sticks of the pennants.
Here are my other layouts that I chose to display my style and skills. I'm so lucky to have a fun subject to scrap.
This post is my application to the Team. I will show you my take on their sketch plus two of my best recent layouts.
Here is the sketch they provided.

And this is my take on the sketch. I like the banners and borders along the photo. I inked around the circles and the pennants with black Studio G ink. I used orange Studio G glitter glue on the circle in the top corner and copper Studio G glitter glue on the sticks of the pennants.

Here are my other layouts that I chose to display my style and skills. I'm so lucky to have a fun subject to scrap.
 |
| Title, picture boarder and journal tag all have inked edges. Hand stiched boarder in the center of the page. |
 |
| Brads and buttons add depth to star cut outs. |
Subscribe to:
Posts (Atom)