Thursday, January 31, 2013

Frosted Designs- Music challenge

Sadly I saw this challenge to late to play along. But I wanted to give it a try anyway. The challenge was to use music in a card, layout or other paper craft. I used sketch 5-3-11 from Let's Scrap for the card. I flipped the strip horizontal instead of vertical.

For this card I used cream and pink card stock. The music note paper is from my stash, not sure of the brand.The Hearts were cut out using the Victorian Romance cartridge for the cricut. The red and pink hearts are both on foam squares to add depth to the card.Under the big heart is a piece of red ribbon, I burned the edges a bit to give the edges a rough look. I added the heart stickers ( I think they are Paper Studio) to the music notes.

The inside of the card features the music note paper and pink card stock. I inked around the edges with brown ink and added the sentiment, " Your love makes my heart skip a beat!". It was a quick project and I'm in the mood now to create more Valentines Day goodies!

Wednesday, January 30, 2013

Lets Scrap 1-30-13


Here is this week's sketch from Let's Scrap.  I choose to do 2 big blocks of several small pictures. I made each block of pictures look like Christmas gifts by decorating the edges with washi tape and bows cut out from the Cricut. I also added some gem stones for a bit of sparkle. I traced around the lights with a silver and black pen just to add some depth. The envelope on contains journaling. I decorated it with washi tape and a gem stone.


My favorite thing about this layout is the holly leaves in the bottom corners. I was really excited for one last Christmas layout and a chance to use them again.
I inked red around the tan layer of the bow and silver along the patterned paper bow. I added a sparkle brad to the center. I added a piece of foam tape under each bow to raise it above the paper.
Thanks for taking a look! Head on over to Let's Scrap to play along with this week's sketch.

Wednesday, January 23, 2013

$10 Quiet Book

I had originally planned to make this project in March for my son's birthday and then it never got finished. I finally got around to finishing it right before Christmas and am happy to say he loves it. I had most of the items on hand so the project actually cost less than $10.


Supplies:
  • 2 Packages of felt (Walmart craft section for around $2 each)
  • Scissors
  • Velcro
  • Thread
  • Needle or Sewing Machine
  • Thin ribbon
  • Marker
Step 1:
Plan out your pages. I found it helpful to sketch out the design for each page. I'm by no means an artist and the sketches looked like they were done by a grade school child but they did the job. I spelt out my son's name and made a theme for each letter. Sorry no picture of my lovely drawings.


Step 2:
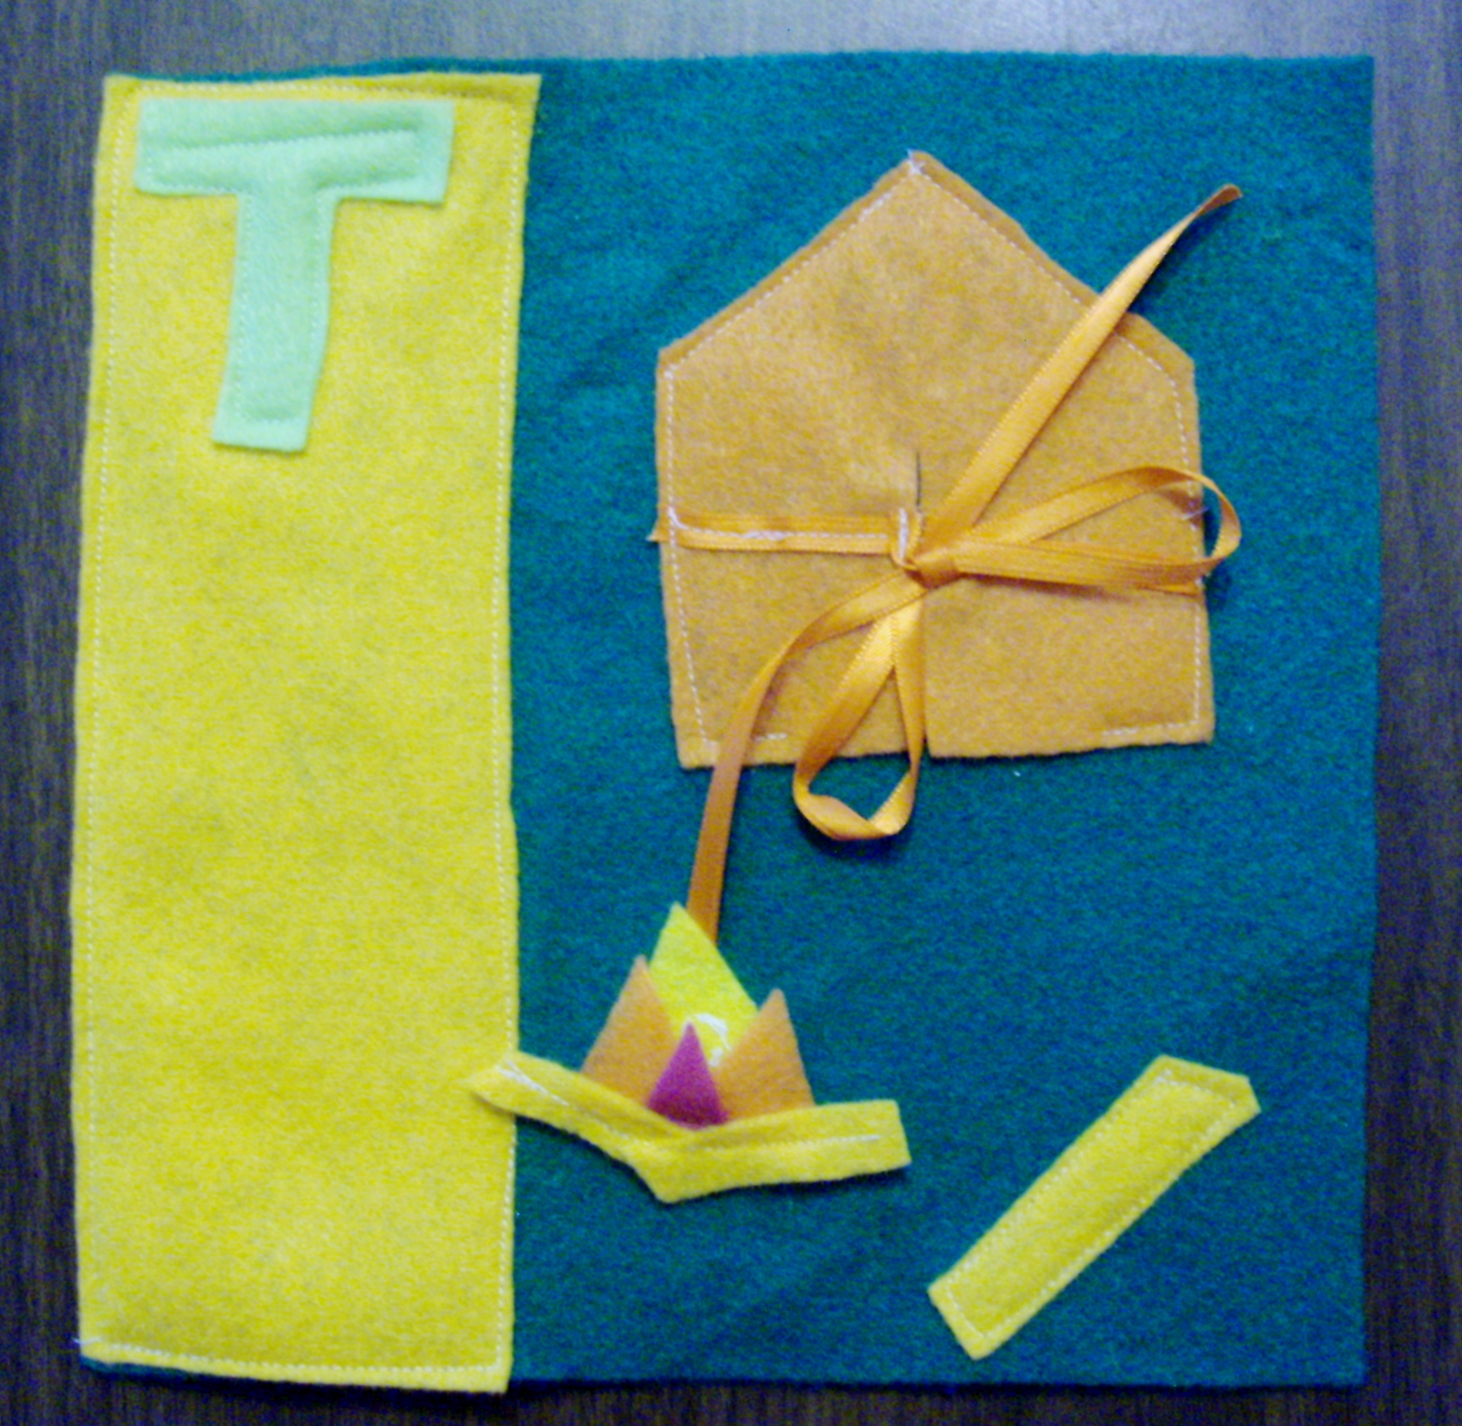
Depending on how much of a perfectionist you are you have 2 choices here, free hand draw your shapes on the felt with a marker or print out images and trace them on the felt. I wanted my quiet book to have character and my shapes were fairly simple so I just drew them directly on to the felt. Then cut out the shapes.


Step 3:
Get your needle out and start sewing. I started by attaching the thin strip of color to the main page. Next I stitched on the letter of the page. And then assembled the cut out shapes. I cut the Velcro tape into small squares I attached one half to the page and the other to a shape. If this quiet book is for a small child like mine was, I recommend using ribbon to connect the shape to the page.

Step 4:
Sew together your pages. I didn't plan ahead on how I was going to attach the pages to the cover. I added a piece of felt between the two pages so that I could bind the pages together. Sorry once again I don't have pictures of this step.

You can see the stitches on the cover and how I attached the pages together.I got out more letters and attached them to the front cover of the book. Thanks for checking out my quiet book. I hope to make a better tutorial in the future. If you make one I would love to see your project feel free to leave a link in the comments.

Tuesday, January 22, 2013

1st snowman

My Mom gifted our family a "Snowman Kit" for Christmas. And last week the weather finally warmed up enough for us to go out and build a snowman. Out of all of our adventures outdoors Tiny Human enjoyed this one the most. He helped put on the buttons and then had to take a break to make a snow angel. Sadly our snowman only lasted a couple of days before he fell over. I can't wait to make another one!

The current DT challenge at Let's Scrap is to make your layout monochromatic with a splash of color. I rarely do anything monochromatic so I had to give this challenge a go. I choose to use several patterns of grey paper ( I'm not sure what brand), then matted 2 photos with orange. Normally I wouldn't use orange in a snow layout but I thought it would be fun since Tiny Human's hat is orange.


I added some journaling above the title and added the date in the center of the snowflake. If you haven't yet please come check out Let's Scrap and play along with the challenges and weekly sketches. Thanks for stopping by have a great day.


Tuesday, January 15, 2013

Inspiration Journal Part: 2

Here is the second half of my journal. As the main pages fill up with journaling I plan on adding cutouts to the envelopes. This was a really fun project and I think it would be fun to make a mini album like this for a gift.


I choose yellow and blue for these pages because I felt like it was cheery and motivating. Each of the white circles is dived into 2 sections and the month written in each section. I plan to track my weight loss each month along with my starting weight and goal. I have a before picture that I want to add to this page. Not sure if I will do 1 a month or just a starting and ending. I think it will be neat to see the changes of my healthy eating and exercise.


4-21-10
The next section is for my crafting/Jewelry making.

 
I flip flopped this sketch so the "windows" would be opposite of each other. I think I will track Jewelry projects on one side and crocheting on the other. That's the beauty of this project it's on going and there is no right or wrong.
 
 
2-18-09
Let's Scrap 2-18-09
The next and final section is for my personal goals. And a place to record special memories through out the year.


I really loved the ribbon so I picked the pink card stock so that I could use it again! It was a tiny roll and the whole thing was used on this project. It is also the ribbon that holds the journal together.
 
2-5-12
Let's Scrap sketch 2-5-12
The last picture I have to share with you is the back cover and spine. The cover is just white card stock that I added red ink and patterned papers to.
 
I hope that this posts brings some inspiration for you all. Best of luck with all of your goals for 2013! Thanks for stopping by!


Monday, January 14, 2013

Inspiration Journal Part:1

Happy Monday! I know I'm slacking on my goal of at least one post every week. Last week was a long one between Tiny Human sick with influenza, I had a cold and then worked all weekend. Other than being a little tired I think we are finally getting healthy! Today I want to share with all off you the journal/mini album I made to keep track of my 2013 goals.
 
Earlier this month while browsing on Pinterest I found a tutorial on making a mini album out of envelopes. The tutorial is from Sarah's Ink Spot Blog and you can find it HERE. The instructions were pretty easy to follow and she has great step by step photos.

I had some extra envelopes from Christmas cards so I decided to give this a try. All but the first 2 pages are made using card sketches from Let's Scrap. I flipped the sketches so that they would mirror each other. All of the patterned paper is from DCWV "The Far East" mat stack that I have had for ever. I thought the Asian prints would be inspiring. The titles I cut out using various fonts from different Cricut cartridges.
 
 
I made a pocket on the inside of the front cover and inserted strips of paper with my goals on them. The blank page on the right side is to write inspirational quotes. The stamps are Studio G.
 
I rotated this sketch to make it vertical instead of horizontal. I will journal each month the # of layouts and cards I create. I'm taking part in Let's Scrap 100 Layouts in 2013 challenge. I'm hoping this will help me reach my goal.

2-17-10
Let's Scrap Sketch 2-17-10
The stamps and ink used for the images on these pages is from Studio G and so is the pink flower ribbon. I also used purple glitter glue to draw a boarder between the ribbion and cardstock. I think I will keep track of the most popular posts for each month.
 
7-21-10
Let's Scrap Sketch 7-21-10
 Thanks for stopping by! Come back again tomorrow to see the rest of my inspirational journal.

Thursday, January 3, 2013

2013 Goals

I always make goals for myself for the new year. Last year it was just one word "Create". This year I have decided to make a list of goals and make a cute scrapbook journal to write them in and track my progress. I will post pictures of the journal as I get it done. Hopefully that will be this weekend :)

Here is my list of goals. I feel the more often I write them the more I am likely to stick to them. I made 5 categories with a few small goals in each one. Cheers to a successful 2013.

Scrapbooking:
  • Complete 100 layouts in 2013
  • Make 50 Cards in 2013
  • Be on another DT (hopefully another term at Let's Scrap)
Blogging:
  • 1-3 posts per week
  • Tutorial once a month
  • 1 Kid's craft a month
  • Gain more followers
Crafting/Jewelry
  • Make at least 1 piece of Jewelry a month.
  • Sell more items either on Etsy or Craft shows.
  • Learn more crochet patterns
Fitness:
  • Lose 5 lbs by May 1st.
  • Tone Tummy and thighs
  • Exercise 3 times a week
Personal:
  • Don't sweat the small stuff
  • Be positive
  • Pay of debts

Wednesday, January 2, 2013

Let's Scrap 1-2-13

Happy New Year! This week's sketch from Let's Scrap is a fun one. It was a real challenge for me with the round photos and all of the embellishments. Not going to lie it took me a lot of time to get going with it. I would look at it curse, stomp my feet then walk away. I decided to just do the second page and make a 1 page layout. And overall am happy with how it turrned out and happy to step out of my comfort zone.


I've been wanting to do a father and son layout for quite some time now but my sweetheart hates getting his picture taken and there fore I haven't had any photos to work with. Turns out him and the Tiny Human had a photo shoot the other day while I was at work, and he was hiding the pictures on his phone. Good thing I'm snoopy ;) and found them.

The background paper is from The Paper Studio, Boys and their toys stack. Star die cuts and title are K&Company. And the gemstones are also from The Paper Studio.