Wednesday, November 28, 2012

Big News!!!

I am very excited to announce that I will be on Let's Scrap December-March Design Team! I would like to congratulate the other ladies on making the team and am looking forward to working with you this term.

A big round of applause to the following ladies:

Cathy VandeBruinhorst (DT Coordinator)
Charlotte van Wijk
Michelle Looi
Jeaunes Viljoen
Kristine Ponte
Eniko Delisle
Janet Gregory
Heather Corbitt
Val Thorpe
Martha Sterbens


Tuesday, November 20, 2012

Stamped Tea Towel

Happy Tutorial Tuesday!

Today I'm going to show you how to make cute stamped tea towels. They are a great handmade gift and the possibilites are endless.I made 9 of them in a little over an hour. I would recommend having 1 extra towel to try out your stamp. That way you will know how much paint and pressure to apply to get your desired image.
 Here are the supplies you will need:
  • Tea Towel ( $1 at Dollar Tree or Walmart)
  • Fabric Paint ( I got mine at Hobby Lobby $3.49, I had a 40% off coupon so they were even cheaper)
  • Foam Brush ($1 at Walmart)
  • Rubber Stamps ($1 each from JoAnn's)
  • Something to put the paint in ( I used a lid from a cottage cheese container)
First step if your towels are full of wrinkles like mine were give them a quick once over with a hot iron. Wrinkles will distort the image from your stamp.

Next decide on a pattern and where on the towl you are going to stamp. You can create a design to cover the whole towel or do just the edges to make a boarder. I did along the top and bottom edge to create a boarder when the towel is hanging.

Now you are ready to create! I squeezed out a big glob of paint on to the lid and dabbed my brush into it a couple of times. Remember its best to start with less paint. Gently apply the paint to your stamp using the foam brush. Then with even pressure stamp the towel. I practiced a few times to get the right amount of paint and pressure.

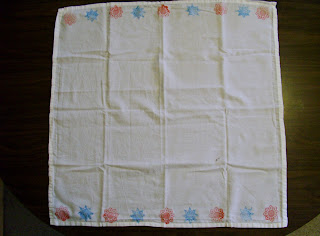
I did the red snowflakes first. One in each corner and then one in the center.Followed by another red snowflake in the between. Then a blue in between each red. This helped with making the spacing consistent.

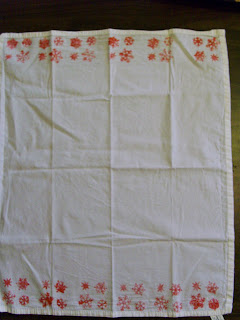
This one was made using the clear stamps on an acrylic block. I didn't like how it turned out.
 Here are my finished product. They turned out great and were realtively inexpensive to make. Hope you enjoyed this tutorial. If you use it come back and leave a link to your project, I would love to see what you made.


Monday, November 19, 2012

Let's Scrap DT application

I love Let's Scrap. It's a great site not only to find 2 page sketches but also a community of scrappers to share your work with. I was really excited to see that they are looking for they are looking for term Design Team. I have applied to several other DT's in the last couple of months and have decided this will be my final application for awhile. So my fingers are crossed and hope that I make the team :)
A close up view of the first page
Close up view of page 2
The stickers I have had in my stash for awhile now. And the ribbon was part of a prize I won from Scrappin' ..... Expect the Unexpected. I don't remember what brand it was.


I made the title using Cricut Craft room and the weld feature to make the phrase all one piece. It took a lot of trial and error and several curse words but I'm happy with how it turned out. I thought the bat sticker was a great addition to the page since we carved a bat on our pumpkin.
 
 
Thanks for stopping by have a great Monday!


Wednesday, November 7, 2012

Crochet Scarf

I have been bitten by the crochet bug! I have a list a mile long of all of the projects I would like to make. Since I am just getting started I'm trying to keep them as simple as possible. I see many scarfs in my future as I become more comfortable with the different stitches.


After looking at several patterns for infinity scarves on Pinterest I came across this one. I like how it was worked in a flat piece then stitched up at the end. Another great benefit is it only takes 1 skein of yarn.  Jay's Boutique Blog has several cute free patterns that I'm sure I will be making in the future.


This scarf isn't very long but wrapped around your neck twice makes a great cowl. The color is hard to see. The yarn I used was mostly tan with flecks of navy, red and green in it. It took me about a day and half to make. Not to bad for a beginner ;)  My next project is a coffee sleeve using the left over yarn from this project!


Monday, November 5, 2012

Learning to crochet

Happy Monday!
I'm taking a break from paper crafting for awhile. It seems I've lost my mojo, so while I'm waiting for it to return I decided to learn a new craft. Thanks to pinterest and crafty groups I belong to I got inspired to start crocheting.

At first I tried using a couple books my Mom gave me. I learned how to do the basic chain and that's about it. The pictures and the descriptions had me confused. I googled " how to crochet" videos and came across this great site. She has a Crochet School which is a series of posts that have step by step videos that walk you through each step and basic stitch of crochet.

After watching the videos I got brave enough to try a project of my own. I had some great cotton yarn from Peaches and Cream left over from a past knitting project so I decided to try my hand at a wash cloth. I guess the books came in handy after all because that's where I found the pattern.

I struggled quite a bit with tension so my rag ended up a little lop sided. I did 2 rows of a single crochet around the edge to make a boarder. I'm pretty happy with my first attempt.
Currently I'm working on a cowl scarf so far so good I will post about it once I get it finished. Have a great week!