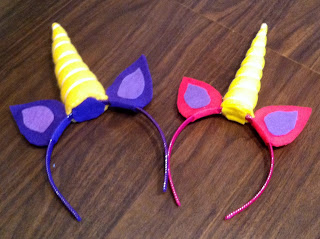
Tiny Human 1.0 was invited to a unicorn themed birthday party. His gal pal loves unicorns. And yes I could go out and buy a unicorn theme gift but that wouldn't be nearly as fun as crafting something. I searched the internet for unicorn headbands then set out to make my own. 1.0 insisted that he needed one as well so he got to keep the trial run. The much nicer version is the gift for the birthday girl.
Unicorn Horn Headband Tutorial
Paper for pattern
Yellow felt for horn and coordinating fabric
Colors felt for ears
Fiber fill or stuffing
Thread and needle
Hot Glue Gun
Scissors
Headband
Lets Get Started......
Cut out pattern pieces from paper. I just free hand drew mine. The measurements for my pieces are: Horn 7 ¼” x 6”, Outer Ear- 3 ½ “x 1 ¼”, Inner Ear 1 ¾” x 1”.
Pin pattern pieces to felt and cut out. You should have 1 horn cone and 2 of each of the ear pieces. For the outer ear double up felt and place bottom edge on fold. This will create a piece that is easy to attach to the headband.
Fold cone in half and pin along open edge. Pin ribbon to tip of cone. The ribbon should be in the inside of cone. With a narrow seam allowance sew from tip to bottom corner of cone (can do with a sewing machine or by hand). I left the ribbon attached to the spool and cut after step 5.
Turn cone inside out and fill with stuffing. Use small bits of stuffing at a time. The end of a pen or pencil works well to get stuffing in the tip of the horn. Ribbon should be sticking out the top of your horn.
Secure ribbon to tip of horn with a dot of glue, preferably on the back side near seam. I found this step necessary after my ribbon started to unwind after 1.0 was playing with the first horn I made. Wrap ribbon in a diagonal manner around horn ending at the seam in the back. Cut ribbon and attach to the inside of seam with a dot of glue.
 |
| Back view of horn |
Cut a piece of felt the size of bottom of horn and pin on. Using a needle and thread attach felt piece to horn using a whip stitch. You can sew the horn on to the headband in this step or attach with glue and another piece of felt later. That’s what I did because I thought it added more stability.
 |
| You can see the whipstich as well as the felt used to attach horn to headband |
Glue or sew inner ear pieces to 1 side of the outer ear pieces
Attach horn to center of head band. I put glue on the top of the headband stuck on the horn then glued another piece of felt to the bottom of horn and underside of the headband.
On either side of the horn, fold the ear pieces around the headband and glue or stich together. I glued mine.
Now put on that headband and wear it with pride! Or give it to your favorite little person to enjoy. Thanks for checking out my tutorial!
If you use this tutorial please link back to my blog. Headbands made using this tutorial are for personal use only not for sale.


No comments:
Post a Comment