Saturday, June 13, 2015

Unicorn Headband Tutorial

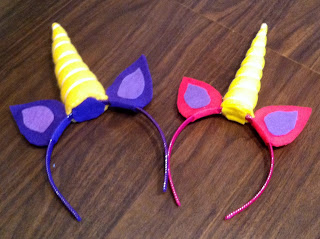
Tiny Human 1.0 was invited to a unicorn themed birthday party. His gal pal loves unicorns. And yes I could go out and buy a unicorn theme gift but that wouldn't be nearly as fun as crafting something. I searched the internet for unicorn headbands then set out to make my own. 1.0 insisted that he needed one as well so he got to keep the trial run. The much nicer version is the gift for the birthday girl.


Unicorn Horn Headband Tutorial


Supplies:
Paper for pattern
Yellow felt for horn and coordinating fabric
Colors felt for ears
Fiber fill or stuffing
Thread and needle
Hot Glue Gun
Scissors
Headband

Lets Get Started......

Cut out pattern pieces from paper. I just free hand drew mine. The measurements for my pieces are: Horn 7 ¼” x 6”, Outer Ear- 3 ½ “x 1 ¼”, Inner Ear 1 ¾” x 1”.


Pin pattern pieces to felt and cut out. You should have 1 horn cone and 2 of each of the ear pieces. For the outer ear double up felt and place bottom edge on fold. This will create a piece that is easy to attach to the headband.

Fold cone in half and pin along open edge. Pin ribbon to tip of cone. The ribbon should be in the inside of cone. With a narrow seam allowance sew from tip to bottom corner of cone (can do with a sewing machine or by hand). I left the ribbon attached to the spool and cut after step 5.

https://t-craftingnscrapping.blogspot.com
I'm demonstrating how to pin the ribbon with my pattern piece


Turn cone inside out and fill with stuffing. Use small bits of stuffing at a time. The end of a pen or pencil works well to get stuffing in the tip of the horn. Ribbon should be sticking out the top of your horn.

Secure ribbon to tip of horn with a dot of glue, preferably on the back side near seam. I found this step necessary after my ribbon started to unwind after 1.0 was playing with the first horn I made. Wrap ribbon in a diagonal manner around horn ending at the seam in the back. Cut ribbon and attach to the inside of seam with a dot of glue.
https://t-craftingnscrapping.blogspot.com
Back view of horn


Cut a piece of felt the size of bottom of horn and pin on. Using a needle and thread attach felt piece to horn using a whip stitch. You can sew the horn on to the headband in this step or attach with glue and another piece of felt later. That’s what I did because I thought it added more stability.

https://t-craftingnscrapping.blogspot.com
You can see the whipstich as well as the felt used to attach horn to headband


Glue or sew inner ear pieces to 1 side of the outer ear pieces

https://t-craftingnscrapping.blogspot.com
I glued mine

Attach horn to center of head band. I put glue on the top of the headband stuck on the horn then glued another piece of felt to the bottom of horn and underside of the headband.

On either side of the horn, fold the ear pieces around the headband and glue or stich together. I glued mine.
https://t-craftingnscrapping.blogspot.com
view of bottom of headband to show attached pieces

Now put on that headband and wear it with pride! Or give it to your favorite little person to enjoy. Thanks for checking out my tutorial!

https://t-craftingnscrapping.blogspot.com
I'm a beautiful unicorn!

 If you use this tutorial please link back to my blog. Headbands made using this tutorial are for personal use only not for sale.

Friday, September 6, 2013

Adventure in Pre-school at home

My little Tater Tot has a huge thirst for knowledge. He already knows his ABC's, can count to 15 and knows a variety of shapes including semi circle, octagon as well as the basics and he knows several colors. To me that is an impressive list considering he is 2 years old. I want to continue to foster his love of learning and help him anyway I can.

During June and July I came up with themes and corresponding activities to inspire learning in our home. The themes we did were: Bugs, Monsters, Dinosaurs and Pirates. I took a lot of pictures and will eventually get around to doing a post about each of them. Each theme lasted a couple of weeks. We would spend about an hour or less a couple days a week doing our theme activities.  I started out by doing a movement exercise or song. It was a lot of fun to turn on music and watch him dance around like different bugs and dinosaurs. Next we would do the craft project or learning activity and finish of our learning time by playing outside. And somewhere throughout the day we would read some of our library books.

The month of August was crazy and for what ever reason we really didn't do any structured learning with themes. We continued our Library time and movement activities though. I really wanted to send Tater Tot to preschool this fall. But even part time 2 days a week was more than we can afford. After several hours looking on Pinterest, I felt confident that I could do preschool at home with him. You can find all of the ideas I've pinned here.

Here is the chart I made to write up our weekly lesson plans. After the 1st week I'm sure there will be changes that I will have to make but I felt like it was a good starting point. I will let Tater Tot lead the way and our "School Time" will last as long as he is interested. I'm really excited to start this adventure and I can't wait to share our journey with all of you.
For the first 2 weeks in September will be doing an apple theme, with focus on the letter A, number 1 and circles. Be sure to check back and see what we have been up to :)


Friday, August 9, 2013

Cut It Up: What's Bugging You? Challenge #25

Happy Friday Friends! Very excited to play along with this weeks challenge over at Cut It Up.This week's challenge is to make a creation using a bug. Being a mom of a little boy I have lots of bug choices in my cricut cartridges. My favorite 2 to use are "Create a Critter" 1 and 2.


This is another side step style card. Yes I might be addicted to making these now! I used light blue card stock for the base of the card and it is A2 size (4.25 x 5.5 inches). Next I added a 2 pieces of green patterned paper for the grass. I fringe cut the back piece to make the grass more realistic. Next I added my cut outs, they all are from the "Create a Critter" and "Create a Critter 2" cartridges. For finishing touches I used liquid pearls to make the clouds, heart on the hive and the stems of the flowers. The sentiment on the inside of the card says, " Happy BEE-day!".

Thanks for taking a look at my latest creation. Have a great weekend!